Though it may seem intimidating, our explanation makes it easy…
If you have recently started using a vaporizer for cannabis, you know there are lots of factors to consider. For a month or two, the hits can feel velvety smooth and delicious. However, after residue and other particles build-up, the quality of the smoke changes immensely. At that stage, it is clear that the vaporizer needs a good cleaning.
The thought of cleaning a vaporizer may seem time-consuming or intimidating, but the process is relatively easy.
Whether you are utilizing a vaporizer for dry herb, oil cartridges, wax, or something else, this article can help. It provides a simple explanation so that even beginners can effortlessly clean their devices.
It is essential to recognize that proper cleaning is part of your vape device’s regular maintenance. It helps prolong the overall life of your vape. It can save you a lot of money and time in the long run.
Virtually everyone that begins vaping is unfamiliar with this process at first. The right method for cleaning a vaporizer isn’t necessarily intuitive. After some practice, however, you will find it easy and no longer make excuses to avoid the process!
Please keep reading to discover simple ways to clean a vaporizer with our beginner’s guide…
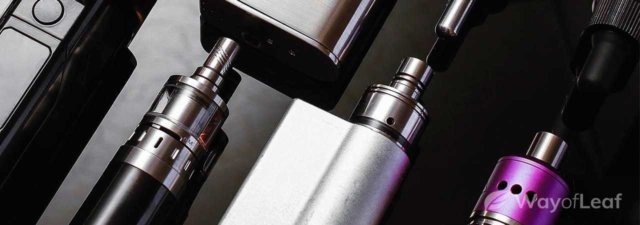
Understanding How a Vape is Constructed
Learning how to take something apart and return everything together requires an understanding of how it operates. Although vaporizer technology itself is quite specialized, understanding the basic anatomy of the device isn’t challenging. It mainly falls back upon a few key pieces or elements.
The device begins with a base containing the battery. It is often referred to as a vape box or a box mod (if it has a removable battery). This region is usually rechargeable with a micro-USB port. Some of these box mods and vape boxes also contain LED screen controllers. These allow you to adjust the strength and potency of the smoke by increasing the voltage.

On top of the box mod or base is the tank base. This is the lower half of the tank that creates a seal and a connection between the electrical parts and the container that holds your liquid, wax, cartridges, dry herb, etc.
The coil is on top of the tank base, which is the point of heat contact for the substance inside of the tank. This is how various elements are converted into the famous vapor. It is down to the coil(s), which are inside the atomizer.
The holding tank is generally on top of the coil. For marijuana users, the tank is a chamber that supports cartridges, waxes, and even dry herb. When you purchase your vaporizer, it should clearly state the substances you can use.
A tank lid and a drip tip or mouthpiece seal the chamber. Both of these act as regulators and prevent the contents from spilling out. They also make it convenient and comfortable to inhale the vapor.
Frequent Rinsing Is Important
You don’t need to perform deep cleans excessively. However, you are encouraged to complete simple rinses to ensure you continue enjoying fresh flavors with each hit. If you vape standard nicotine vape liquids, this step is vital to ensure the flavors don’t blend.
With dry herb, this is a little less important. However, allowing different strains to mix could result in an unusual sensation.
Quick & Easy Rinsing
Luckily, rinsing is a quick and straightforward process. Indeed, it is effectively the same process as soaking the dishes.
- Begin by filling a bowl with warm water. Remove the holding tank or chamber from the vape box or box mod.
- Disassemble all the pieces of the holding tank. Gently add all of the small parts into the warm water. Wipe away the leftover residue with a paper towel or cloth.
- Let it soak! Water is the universal solvent, so let the parts of the vaporizer sit submerged for as long as necessary. The process usually takes a couple of hours. Doing this allows all the gunk to soften and become broken up. It makes everything easier to wipe clean with a paper towel or Q-tip later.
- Add in a little splash of gentle, biodegradable dish soap if you feel the residue is extra tough to remove.
- Remove all the components from the water and dab them dry with a clean cloth or paper towel. Set them aside in a safe location so they can air dry for 5-20 minutes.
- Once they have air-dried long enough, wipe everything down with paper towels. You’ll also need Q-tips for the smaller nooks and crannies. For the tiny, hard-to-reach spots, try wrapping the butt end of a needle in Kleenex.
- Connect all the parts, and attach them to your vape box.
The Deep Clean:
Has the quality of your smoke changed to the point where it is no longer an enjoyable experience? Don’t assume your vaporizer is broken, or the vaping material is low-grade. There are two options to consider before assuming there is a severe issue with your vaporizer’s interior. The first one is to accept that your vape device badly needs a deep clean.
You should perform one every 1-2 months in any case, especially if you are a daily vaper. This is especially the case if you use dry herb because the residue builds up quickly. Leave it untouched for long enough, and it becomes challenging to remove.
Disassemble your tank and all the bits that connect to the box mod or vape box. Next, place them into a bowl.
- Use a strong, clear spirit such as vodka. This high proof liquid helps cut through the grease and residue. It is not as strong as rubbing alcohol, which evaporates quite quickly anyway. Avoid using harsh chemicals as they will damage your vaporizer.
- Use a small brush to scrub any trouble spots that remain. Choose a material that is not too rough, so you don’t damage the fragile compartment parts.
- After the alcohol soak, pour out the spirit and fill the bowl with warm water. Rinse away any of the remaining vodka. You may need to do this two or three times.
- Hand dry all the pieces with a clean cloth or paper towel. Set them aside to air dry for 5-20 minutes, until you believe they are ready for reassembly.
- Reassemble the pieces and enjoy smoking a smooth, velvety vape once more!
Still Having Problems?
If you still have issues after a deep clean, your coil is possibly in need of a replacement.
Over time coils burn out; this is just the nature of how they work.
Thankfully, they are easy to replace and quite inexpensive. The coil is an essential addition to your vaporizer. It is predominantly what provides the tasty flavor and generates most of the pleasure in vaporizing.
The coil is located above the tank base but below the tank itself. You can remove it by unscrewing the parts and taking out the old coil. Then you can put a new one in its place. Be sure to dispose of old coils; you can’t reuse them.
Once the new coil is in place, reassemble the device. Make sure all the pieces are screwed on tightly to avoid leaks and spillage.
Final Thoughts on How to Clean a Vaporizer
We hope this beginner’s guide was able to provide some clarity and “dissolve” (no pun intended) any confusion. The process itself is not that complex, though it may sound time-consuming or intimidating. However, in practice, you’ll find the above methods are easy to implement.
By the way, you shouldn’t go straight into the process of using your vaporizer after cleaning. Before use, switch it on with an empty chamber and set the temperature to around 220 degrees Fahrenheit. Allow the vape device to operate for a few minutes. This process removes any remaining traces of alcohol or water. It is far better to vaporize these elements than inhale them!


![Kandypens Vape Review [Price + Product Comparison]](https://wayofleaf.com/wp-content/uploads/2019/01/wol-banner-kandypens-vape-review-for-2020-640x225.jpg)

![Brass Knuckles Vape Review [NEW Updates!]](https://wayofleaf.com/wp-content/uploads/2018/12/brass-knuckles_1920-640x225.jpg)
![The Full Hydrology9 Vaporizer Review [From Cloudious9 Vapes]](https://wayofleaf.com/wp-content/uploads/2018/11/hydrology-9_1920-640x225.jpg)


![What Is a Vape Atomizer? [Clearly Explained]](https://wayofleaf.com/wp-content/uploads/2018/05/mj_what-is-an-atomizer-for-vaping_1920-min-640x225.jpg)