If you want to learn how to grow bigger cannabis buds, understanding the best fertilizers and nutrients for the job is crucial.
To achieve an abundance of fat, healthy, THC-rich flower in your crop, you’ve got two options:
- Use a cannabis-specific organic nutrient kit
- Build your own nutrient profile using inert soil and a combination of organic soil amendments
In this article, I will tell you how to do both. Or, if you don’t feel like reading, here’s my pick for the best cannabis fertilizer for the year:
Homegrown Cannabis Co.’s Cannabis Fertilizer Powerup kits are ridiculously easy to use, and in my opinion, they’re the best marijuana fertilizer by a mile – especially for beginner growers. Continue reading below to learn more about them, or hit the button below to check them out on the Homegrown website:
Let’s Be Honest: Nutrient Analysis Is a Pain
Optimizing nutrients to produce smokeable flower at the end of a grow isn’t all that simple – especially for beginners. The process involves constant monitoring of plants and investing in expensive digital input/output measuring devices.
Plus, to really understand the NPK ratios in your crop, you have to:
- Extract soil samples almost daily
- Dissolve them into an aqueous solution
- Use a soil test kit and pH meter to quantify and compare nutrient ratios
Do you have the time to do this every day?
If you’re like 99% of average at-home DIY growers, the answer is no.
Every successful grower has a preferred method of managing nutrient input. However, my recommendation for new growers looking to simplify nutrients during each growth cycle stage is to use an NPK amendment kit. You won’t develop hardcore soil analysis skills, but you’ll give yourself the best shot at obtaining a healthy, smokeable yield of resin-filled flower.
The Best Marijuana Fertilizer Kit (Well… At Least My Personal Favorite)
There are a few good amendment kits out there. Still, I started using Homegrown Cannabis Co’s Powerup kits in May 2022, and I’ll never use another marijuana fertilizer as long as I’m growing weed at home—seriously. As long as you start with good, unamended organic soil (like Promix HP), all you have to do is follow the instructions on the kit, and you’ll have optimal NPK ratios at each stage of your crop, from germination all the way to harvest.
In the next section, I’ll explain why I’m such a fan of the Powerup kits (specifically the Advanced Marijuana Fertilizer Kit with Germ Genie). Basically, they eliminate having to think about NPKs during your grow.
You dissolve the nutrient packs in pH-balanced water when you water the cannabis plants (I prefer wet-to-dry cycling), and that’s it. There’s no manual amendment, no pH-up/pH-down nonsense, and, most importantly, no wasted crops.
If you want to take a manual approach and develop real soil amendment skills without even using cannabis fertilizer, I explain how in the second half of the article. However, if you want to take the easiest route possible and virtually guarantee smokeable buds at the end of your cycle, I highly recommend Homegrown’s Organic Powerup Packs.
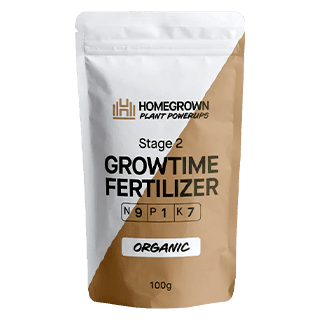
Why Powerups Are the Best Marijuana Fertilizer
I think Homegrown’s Plant Powerups offer the most straightforward nutrient solutions and are the easiest to read and understand. They’re available in two varieties (Standard and Organic), and the label specifies which pack you should add to your soil depending on which stage of the growth cycle your plants are in.
The Organic packs, which are slightly more expensive, contain natural fertilizers made from biological sources like animals and vegetables, whereas the Standard packs contain chemical fertilizers. Suppose you can afford to spend the extra money. In that case, I’ll always recommend using the Organic packs because they are healthier for the environment and release nutrients slowly into the soil for gradual absorption. This hugely lowers the possibility of issues like nutrient burn.
Most marijuana fertilizer kits are expensive and hard for beginners to use. Homegrown Cannabis Co.’s Powerup fertilizer kits honestly couldn’t be easier. They come with step-by-step instructions that explain how to add nutes to your soil, and how much to add based on the size pots you’re using. They treat up to 7 plants and they transition NPK ratios during each cycle of the grow – from taproot to final harvest.
Why You Should Start with an Inert Soil
Most growers find that rating and choosing growing mediums, soil, and nutrients are complicated aspects of cultivation. Soil is always the cheapest and easiest option for novices, and good inert soil gives growers complete control over the nutrients their plants will receive at each growth cycle stage.
Starting with inert soil can also help you gain the ability to assess things like soil pH and nutrient levels and teach you to read and comprehend your plants. Promix HP is my favorite soil. It’s an excellent inert peat moss-based soil with mycorrhizae and is easily acquired online or found at most legit gardening supply stores.
Inert soil means you’ll need to modify your nutrient ratios as your plants mature and grow, which will require modifying how “hot” your soil is. NPK, which stands for nitrogen, phosphorus, and potassium, are the three essential elements for growing cannabis. These are called macronutrients because they are added to soil in significant amounts.
The best nutrients for growing cannabis depend on the plant’s stage of growth:
- Vegetative Stage: High nitrogen, medium phosphorus, and high potassium
- Flowering Stage: High phosphorus and potassium, and low nitrogen
Whatever product you buy must also contain various micronutrients such as iron, copper, boron, sulfur, manganese, and magnesium.
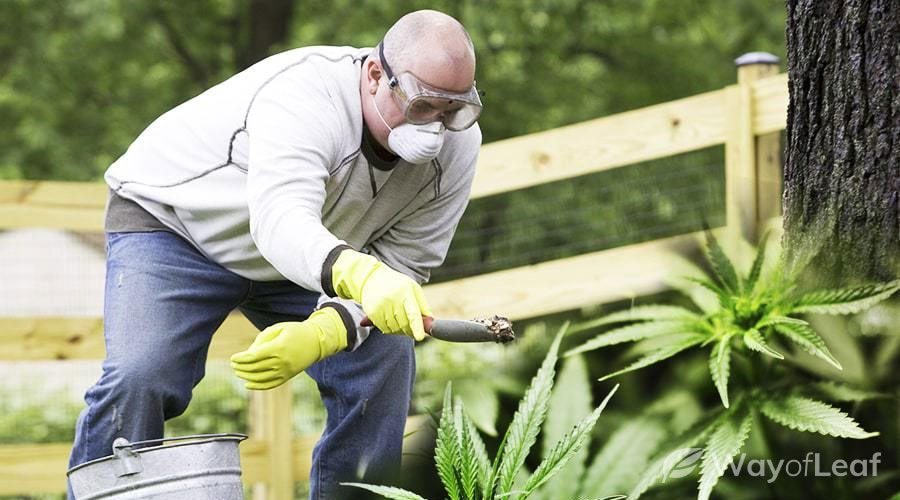
Making Your Own Marijuana Fertilizer
If you’re a purist, this section of the article details how you can make your own soil amendment from organic waste and compost without buying or using a marijuana fertilizer. Below, I outline several environmentally friendly options capable of helping you produce high-THC marijuana plants.
Vermiculite and Perlite
Vermiculite and perlite are often considered interchangeable, but they are different entities. They are both relatively sterile, inorganic products but look and behave differently. Perlite is hard and porous, made by heating volcanic glass to an extremely high temperature. Meanwhile, vermiculite is soft and spongy and is made by heating mica (silicate) to an incredibly high temperature.
Perlite is typically white, traps water, and is alkaline. Vermiculite is tan or brown, absorbs water, and has an almost neutral pH. The two materials are often sold together despite their differences, with the combination absorbing water up to four times its weight.
Most importantly, perhaps, vermiculite and perlite provide calcium, magnesium, and potassium, which get into the soil and nourish your marijuana. If you want to grow hydroponic marijuana, you can create a fertilizer that includes 50% of perlite and vermiculite, with the rest made up of peat moss and water. If you use soil, you only need 10% of perlite and vermiculite in your fertilizer.
Human Urine
Though it may sound bizarre, human urine is a fantastic fertilizer for marijuana. Fresh urine is high in nitrogen, a key nutrient in weed growth.
When eating the typical Western diet, the nitrogen, phosphorus, and potassium (NPK) ratio is 11-1-2. For reference, blood meal is 12-2-1. However, the breakdown of your urine can depend on your diet.
Please do not urinate directly on your plants! It will probably kill them. Urine contains a lot of salt, so it must be diluted to a ratio of at least one-part urine and ten parts water. However, if you water potted plants or seedlings, dilute the urine to a 1:20 ratio.
Only use your urine if you are healthy. Do not use it if you are on medication or have a urinary tract infection.
Wood Ashes
Wood ash contains ample potassium and lime for your plants. You can even use the ashes from your fireplace, assuming you have burned wood. Lightly scatter the ashes around the base of your plants, or add them to a compost heap.
One issue is that the ash will produce high amounts of salt and lye if wet. It is also important to note that, on average, ashes from hardwood trees, such as maple and oak, contain more nutrients than ash from other trees.
Wood ash also acts as an effective pesticide, keeping pests such as slugs, snails, and other soft-bodied invertebrates at bay.
Bat Guano and Fish Meal
If human urine grosses you out, then bat guano is another one you might want to miss. A fancy term for bat poo, guano has been used as a soil enricher for eons. You can also use manure from other animals, including chickens and cows.
Bat guano is often worked into the soil or made into compost tea. Bat guano’s NPK ratio is 10-3-1, making it suitable for use during the vegetative stage. Meanwhile, chicken manure releases nutrients slowly and can enhance yield.
Fish meal is typically made from ground-up parts of the fish that are inedible. The result is a fine powder that can be added to your soil. Fish emulsion is pressed fish oil. When combined with the meal, it prolongs the release of nutrients. Fish meal is high in nitrogen. Alternatives include blood, bone, and soy meal.
Worm Castings
This comes from an earthworm once it digests soil or other organic components. It is laden with tiny organisms and loaded with nutrients. It is commonly added to compost tea because adding it directly to weed, especially during the flowering stage, could result in your marijuana tasting like worm feces.
Composting
You can compost kitchen waste and other organic materials and expect to be rewarded with wonderfully fertile soil. As well as boosting your plant’s growth, composting reduces your landfill contribution and enriches the soil in your locality. Your compost heap can contain anything; as long as it is organic.
This means you can use the food you throw out, chicken manure, worm castings, and bone meal. After creating your compost heap, turn the compost with a pitchfork (daily, if possible) until the contents have been properly mixed. Doing this maximizes decomposition and reduces the time it takes for the heap to become usable. As a rule of thumb, you can expect your compost to take three months to become usable.
You can also learn how to make compost tea, a liquid version of your compost heap. You need organic molasses, organic compost, water, a bucket, and a few other materials. It normally takes around three days to make, and you should use it as soon as possible.
Hydroponics
If you have a hydroponics setup, you are using a growing medium such as rockwool or coco coir instead of soil. As a result, you need store-bought nutrients made especially for hydroponics. These nutrients will contain no organic matter as they are provided through minerals and should contain optimum NPK ratios.
Carbon Dioxide Boosting
The process of photosynthesis involves plants using oxygen, sunlight, and carbon dioxide (CO2) to create energy. When you increase and learn how to use the CO2 in your grow room, you boost your marijuana plants’ growth. One of the simplest ways to achieve this is using white vinegar and baking soda. Set it up so that one drop of vinegar falls into a bowl of baking soda every two minutes, and marvel at the CO2 increase in the room.
In an outdoor setting, you need to improvise, as the vinegar smell could land you in trouble with the authorities. A useful CO2-increasing technique involves placing a large plastic bag over the plant. Then, fill an empty plastic jar with baking soda until it is 25% full. Put the open jar beneath the tent created by the plastic bag.
Pour a tablespoon of vinegar into the jar until it begins to foam, indicating it generates CO2. Reseal the bag, allow the plant to breathe for a quarter of an hour and add more vinegar to what’s left of the baking soda. Stir with a stick and leave the bag over the plant for at least four hours.
If you are growing cannabis indoors, you could invest in a CO2 cylinder or a generator.
Looking For the Right to Grow Marijuana at Home?
If you’re fortunate enough to live in a state where medical marijuana cardholders can grow the plant at home, consider applying for an MMJ card if you haven’t already. By doing so, you can cultivate marijuana privately, enabling you to use nothing but organically grown buds. Home growers can experiment until they find the right marijuana for their needs. Join them today by getting your MMJ card.
Become a Qualified Medical Patient Today
Synthetic or Organic Fertilizer?
Some tried and trusted products, such as Miracle-Gro, are worth buying if you are a novice grower. Over time, however, you will learn that pre-packaged products are expensive and wasteful, not to mention bad for the environment.
As well as saving a small fortune by using organic fertilizer, you learn so much more about plant nutrition and understand what your plants need and when. Eventually, this knowledge will lead to larger yields and more potent buds. The key is to determine what nutrients each organic element brings. For example:
- Nitrogen: Worm castings, bat guano, human urine, and chicken manure.
- Phosphorus: Bone and fish meals, rock dust, and banana peels.
- Potassium: Fish meal, wood ash, and kelp.
- Calcium: Clay, gypsum, and limestone.
- Magnesium: Epsom salts and dolomite.
When Should I Stop Fertilizing?
Create a feed chart to discover what happens when you feed specific nutrients to your plants at set growth stages. If the leaves of your marijuana plants are turning yellow or look burnt long before harvest, it could be a case of nitrogen burn. Check your feed chart to see if it is a likely reason.
If your plants are being overfed, perform a flush with pH-neutral water, but don’t do it in the week before forcing the plants into flowering.
Keep an eye out for nutrient deficiencies but resist the urge to add extra fertilizer. Marijuana plants often need fewer nutrients than you think. Perform a flush any time from two weeks away from harvest, or else your weed could taste of fertilizer!
Finally, it is helpful to understand the difference between a nutrient deficiency and a nutrient lockout, as many novices mistake one for the other.
Final Thoughts on Marijuana Fertilizers
If you see yellow leaves near the base of your plants as harvest time approaches, there’s no need to panic, as that’s a normal occurrence. It is all too easy to overfeed your plants and cause nutrient burn, an issue that could damage your plant permanently, at least in an aesthetic sense.
The amount of nutrients your plant needs depends on the marijuana strain. When using organic fertilizer, start small and gradually increase the dose as and when it is needed. If you use a store-bought fertilizer, begin with half of the recommended dose unless there are clear signs of nutrient deficiency.
Although a novice can use ready-made fertilizers, it is best to educate yourself on the topic and learn how to create organic fertilizers. Not only will this be better for the soil and the environment in the long term, but it will also help you gain valuable insight into gardening. The more knowledge you possess, the more likely it is that you will grow bigger plants and enjoy greater yields.

![Mold Resistant Marijuana Strains [Top 5 Picks]](https://wayofleaf.com/wp-content/uploads/2020/04/wol-banner-mold-resistant-marijuana-strains-640x225.jpg)

![8 Tips for Growing Death Star Marijuana [Grower’s Guide]](https://wayofleaf.com/wp-content/uploads/2018/12/growing-death-star-marijuana-copy-640x225.jpg)
![The Many Colors of Weed [Complete Guide]](https://wayofleaf.com/wp-content/uploads/2018/12/mj_the-colors-of-cannabis-guide-640x225.jpg)


![8 Tips for Growing Durban Poison [Grower’s Guide]](https://wayofleaf.com/wp-content/uploads/2018/09/wol_tips-for-growing-durban-poison-640x225.jpg)